... increase your curb appeal on a budget
Posted by : Latex Agent /
How to ... increase your curb appeal on a budget

Whether you want to increase the value of your house, make your house more of an inviting home, or simply impress your guests and neighbors; you can always find a good reason to increase your curb appeal. Increasing your curb appeal can be a fun project with fast results. At the same time, it is a project that is never finished. There are always more ideas on Pinterest and HGTV. In order to keep this fun, you will need to do some planning and prioritizing. But even with a small budget, you can accomplish a lot.
There are many ways to increase curb appeal. In this article, we want to focus on one that we really like, and that people will notice. But first, here are a few golden rules to achieve stunning curb appeal.
Major repairs come first
Great curb appeal only works if you have your basics in order. If you have a leaking roof, no amount of plants and accessories can distract from the blue tarp on your roof. Major problems not only distract, but they also devalue your house, and can be serious safety concerns. Your money is better spent on major repairs, than on a new flower bed.

Clean up your mess
Once the major repairs are done, it is time to clean up your mess. It is time to take a step back, and take a critical look at your own mess. Does that broken ornament still pass as yard decoration? Do you need to keep your car restoration project on the driveway? Is it time to replace those duct-taped trash cans?
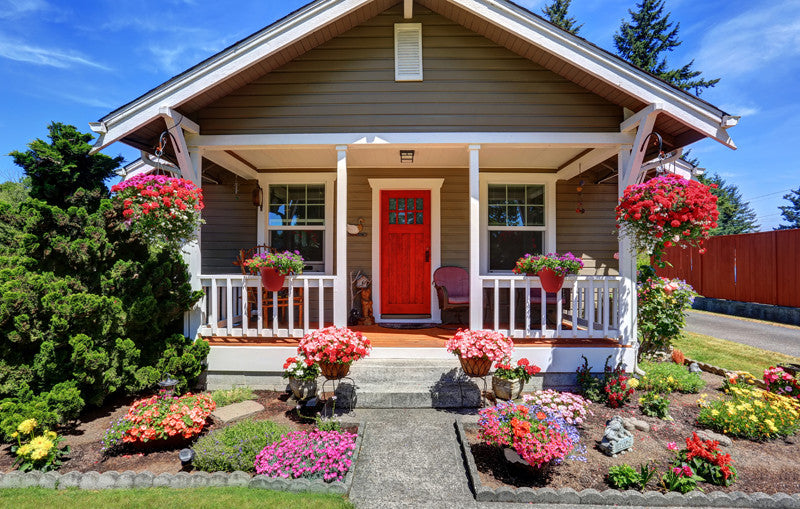
Pick a focal point
Now it is time to start the fun part of the project. And this is where you can easily get lost in ideas, and hop from one project to the next. Our advice is to pick a project and finish that before you start with the next. If you do something halfway and then jump ship, you’ll end up with a messy look.
A well designed curb appeal has one or two focal points. If you do more than that, your yard will likely become too busy and start to look messy. So, what is it going to be? That elaborate Italian fountain, your gorgeous Magnolia tree, or your wrap around porch?
Here is our suggestion for a focal point: your front door. The front door is where the outside transitions into the inside. It is the place where you welcome your guests. It is where home really starts. So why not draw their attention to it right away.
Front doors come in all sorts of styles, from vintage antique to modern, and from farm house style to mansion. Make sure your front door fits with the style you pick for your home and your curb appeal.

Upgrading your front door is one of those projects that you can do on any budget. For less than $50 you can repaint your front door (we will show you how in a minute). If you have a little bit more, you can change your hardware as well, or even get a new door altogether. For a truly unique look, consider looking for a front door at an antique market. It might take you a while before you find one, but once you hit the jackpot, you’ll have a curb appeal like no one else!
Now, let’s tackle the project of repainting your front door.
A new way of repainting
Whether you buy a new door or use your existing one, for a curb appeal that pops you will need to paint it. We have a simple 5 step project outline that will help you prepare for this project and get it done quickly with beautiful results.
We want to introduce a new way of repainting. With this new way you can eliminate the need of sanding and priming before painting. That saves a significant amount of time. Especially when you have a door with some trim details that you can’t sand with a machine. With this new way of repainting, you can replace sanding and priming with Oil Bond. This paint additive is specifically developed to make your paint projects quicker, easier, without compromising the results.
Even though we are going to show you the quickest way with the best results, this project can still take a while before it is finished. Most depends on the drying and curing time of the paint. If you are planning to keep the door open overnight (in order to let the paint cure longer), put a temporal replacement in place, like a storm door, or a large piece of plywood.
Prepare the project
Start your project by removing all the hardware, like the doorknob. Make sure you remember where you place it at the end of the project.
We recommend to leave the door in the frame, mostly because hanging a door back in place can be tricky. If you are up to that task, by all means, take the door out. It will make it easier to avoid drips.
If you have some loose paint on your door, you will need to remove. Use a scraper to remove any flaking or loose paint, and sand the edges. You want to have a solid, smooth surface to paint for the best results.
Wipe
Now it’s time to pull out the Latex Agent Oil Bond and save a lot of time. After a good shake, you pour a bit of Oil Bond on a clean, lint free rag. With this rag, you wipe down the entire surface that you are planning to repaint. Make sure that you reach every little piece of surface. This simple wipe does 3 things in one:
- It cleans the surface.
- It deglosses the surface (the same thing that sanding does)
- It deposits self-crosslinking resins on the surface that will help the paint to stick to the prepared surface.

Before you can paint, your door needs to be dirt and grease free. Oil Bond does this cleaning. However, if your surface is really dirty with mud splatters, you should wipe those off first.
The next thing that Oil Bond does, is it deglosses the surface. This is where you will save a lot of time, and a lot of mess. The traditional method of deglossing a surface is by sanding. But sanding takes a lot of time, and creates a big mess that needs to be cleaned up. By wiping a layer of Oil Bond on your surface, you do exactly the same in much less time and without the mess.
Finally, Oil Bond deposits a layer of self-crosslinking resins on the surface. You will see this when the Oil Bond dries up as a white milky looking layer. These resins are the real magic behind Oil Bond. They grab hold on the old paint on your door at one side, and to the resins in your paint on the other side, creating a tightly bonded finish.
Let the Oil Bond dry for one to two hours before you start painting.
Mix
Next, you mix some Oil Bond into your choice of latex paint. The ratio is 1 part of Oil Bond to 8 parts of paint. That comes to 4 oz. of Oil Bond for 1 quart of paint. Oil Bond has been tested with a wide variety of water-based paints. You don’t need a specific brand or type. You can pick your favorite latex paint in the color of your choice!

Paint
Now it is time to paint your front door. Make sure that the floor under your door is covered with a tarp (or old newspapers) to prevent paint spills on your floor. If you have a door with trim work and details, follow this order of painting the different parts for the best result:
- Revels and details
- Panels
- Center Stile
- Rails
- Outer Stiles

Use a brush for the finer details, and either a brush or a roller for the panels, stiles and rails. Always apply a thin coat of paint. This leaves you with less visible brush strokes, and the paint dries more quickly. It is better to do multiple thin layers of paint, than one thick coat. Make sure you let the paint dry between paint coats. The Oil Bond in your paint does not affect dry time of your paint, so just follow the instructions of the paint manufacturer.
There is no need to add additional Oil Bond into your second coat of paint. Oil Bond does its best job as an adhesion agent between the old (oil based) paint and the new latex paint. Your second coat of latex paint will stick to the first coat, with or without the Oil Bond. Instead of Oil Bond, you could add Latex Agent Hard Coat to the paint you use for your topcoat. This Latex Agent additive makes your topcoat stronger and adds durability to your paint. Great for a front door. Just make sure that you don’t add Hard Coat to paint that already has Oil Bond in it.
Reinstall
Keep your door open while it is drying. Give your paint time to dry before you reinstall the hardware. Latex paint can dry in a few hours, but it can take up to 2 weeks before the paint is completely cured and reached its full strength. If you close the door too soon, the paint can stick to the doorpost, ruining your hard work. Give the paint as much cure time as you can, at least one full day.
The Latex Agent paint additives are game changers when it comes to (re)painting projects. They make your projects easier, and your results better. Danny is a professional painter who has used Latex Agent in many of his projects. Recently he told us about a K-9 training facility where he did a job of repainting the doors. He used Hard Coat to give the paint extra strength to withstand daily scratching by the dogs. Six months later he came back for a different job, and noticed the paint on the doors still looked like new. Not a scratch!

Ready to try it for yourself? Order your bottle of Latex Agent Oil Bond here, and increase your curb appeal.